Permalink | Topics: People Management, Registration - Tags: registration, create, setup, volleyballcanada, membership
Please Note - This help topic applies to Volleyball Canada organizations only
How to Create an Individual Registration Form - Step 2
In this tutorial, we're going to cover how you create an Individual registration form. Individual registration forms are used for participant membership, individual events such as clinics, camps, referee registration, etc. Step 2 is where registration options are added to the form that participants can select such as 12U Girls Indoor Registration Fees, Level 1 Referee Clinic, Coach Clinic, etc.
- Log in to the Control Panel
- Click "Individual Registration Forms"
- Enter a name for your form (either the event name or type of registration)
- Select the "Form Type" (Player, coach, volunteer, registrant, referee)
- Click "Create Registration Form"
- Complete Step 1 and proceed to Step 2

Step 2 - Programs and Products
Instructions can be added above the Programs by clicking the link to "Click here to insert additional instructions above programs information."

Programs/Payment Types
Only one program can be selected at a time when registering. List all applicable options that participants should be able to select from. Additional items or fees can be added via Products.


- Enter the name of the Program or Payment Type that should be available as a registration option
- Click "Add Payment Type"
- If required, select any age and gender restrictions (example From 2001-01-01 To 2002-12-31).
- Select the appropriate Membership Category that is required in order to register for the event. If a membership is not required, select None Required.
- If there is a maximum number of spaces available, enter the max number of coaches. If this maximum should be hidden from the public side of the form, check the box to " Hide from the registration form "
- Enter the Payment Details for the program. This is often the same text as the program type itself but can be different. The details will appear on the public form. Clinics often include the date of the clinic in the details if more than one clinic date is available.
- Enter the amount (price) of the registration option and the applicable tax rate(s) to be applied
- A GL (general ledger) code and optional due date can be added
- Click "Save Changes"
Products
Products can be selected in addition to a program type but cannot be purchased independently.


- Enter the name of the product to be added
- Click "Add Product"
- Enter the price of the product
- Enter the default quantity
- Enter 1 if using a check box question style to add one product if the registrant selects the check box
- Enter 0 if using a number input question style so the registrant can select the quantity they want to purchase
- If using multiple products, entering a category will group all products of the same category together
- Office Use Only products are not available on the public form but can be added to a coach's profile by an administrator. Fines and NSF fees are examples of office use only products.
- If desired, enter a more detailed description of the product
- Enter Tax 1 and 2 (if applicable) and GL (general ledger) code
- Click "Save Changes"
To make a product mandatory:
· Change "Question Style" to Mandatory and click Programs Requiring this Product
o Mandatory for all programs: select nothing
o Mandatory for some programs: select desired programs
· The list shows all mandatory products with a red flag
· Each mandatory product for all programs is always selected, disabled (cannot be unchecked) and shown as mandatory on the form
· Each mandatory product for some programs is selected, disabled and shown as mandatory when those programs are selected, and will uncheck when a different program is selected
· Each mandatory product can still be selected when it's not mandatory
Coupons/Discounts
Coupons are considered as reductions against the Program/Payment Type selected by the participant.


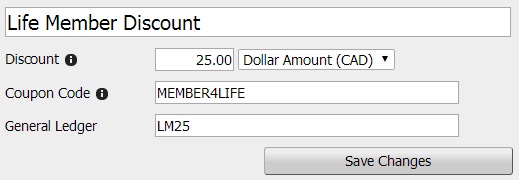
- Enter the name of the discount as it should appear on the public form
- Click "Add Coupon/Discount"
- Enter the amount of the discount
- Select if the discount is a direct dollar amount reduction or a percentage
- If the discount should be available on the form to select with a check box, do not enter a coupon code
- If the discount should only be available to certain people, enter a coupon code that can be controlled by an administrator
- Enter a GL (general ledger) code
- Click "Save Changes"
- Save Programs and Products
Click to Save Programs and Products and select to preview your form (if desired) or proceed to step 3.


